Wednesday, March 20, 2013

Day 5 - software headaches

I spent almost the entire day trying to get Hyperspin working before realizing you have to pay to download all the art for each game, or download them all individually.... for 65,000 games..... umm... no.

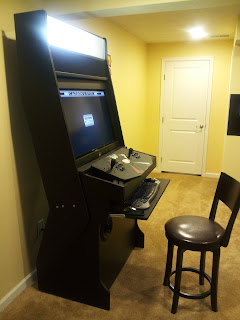
Anyway - little progress today, due to hours of that, but I did DL a few new themes for Gameex and got the beast put in place.  Starting to look a lot better with a partial back cover as well.

Testing it out with the speaker frame.
Wooden frame with speakers mounted on the sides.


Covering the speaker frame with Joann speaker fabric ($2.50)

In place with the plastic holder.

Another look.

Cut and put the plexi in place.  2 sheets - the protective cover is still on - I'll leave it on until the marquee comes.


The wooden frame around the monitor is in place, this will be covered with a spray painted bevel eventually. (maybe tomorrow.)

Other side.  There is a hole drilled into the bottom of the wooden bevel for remote control purposes.  I'll need to be able to change inputs on this TV to support Wii and PS3.

Front view with Gameex


Monday, March 18, 2013

Day 4

I built the box for the control panel.  I plan on putting the control (which will be slightly larger than the box) on hinges so I can access it by flipping it forward, towards the player.

Side view of the pre-controls.


Added a top shelf.  This is where the control panel will drop to.

Sanding.

Another view of the assembled CP.

Booted it up with my temporary X-Arcade CP and sound.

24" light for the marquee

Rear view - I'll mount the Power Strip once I get one with a great surge protector.

Mounted the middle, right and left front speakers.

Rear speakers and sub-woofer in place. 

Rear speakers pointing out the front vents.  I'll put some black cloth behind it and blue lighting effects later one.  Much black paint touch-ups will be needed.

edit - I just noticed now I forgot to paint the underside of the CP.  haha.  Oh well, later.

Thursday, March 14, 2013

Day 3

It's all starting to come together now!  I put the base together late last night and this morning put the top part together.  This was not easy without help, I wish someone else was home to hold one side up while I drilled pilots and screwed.  Either way -eventually, I got it.

I just finished putting the 2nd coat of black paint on both the lower and upper parts.  Once it dries, I'll get some help and take it down to the basement to assemble it.  I can't do the monitor shelf until the rest is assembled so I can see exactly where it needs to be, but I did add the keyboard tray and 12" tray slides today, which really made the whole thing sturdy up.

One minor screw up so far, I drilled the top shelf into the same side of both upper sides... (instead of one left and one right.)  Damn, I guess not too bad.  I just wasn't really thinking things through.  I did also buy 3 vents - 1 for the computer in the back, and the other 2, round for the side/rear speakers.  I'm not sure if I'll do one more in the front for the subwolfer, but I think I will, which might attach to the door which will open to get PC access.  As of now, the front panel is just one solid piece.  If/When I cut it, it'll be already assembled.

12" sliders were surprisingly hard to find.  Home Depot to the rescue.

The keyboard tray mounted.  It took quite a bit of sanding to get it smooth.  I guess I cut the piece very slightly too big.


Keyboard tray closed.  It will actually not close this far once I put the T-Molding on.  It will be more of a 15 degree angle out towards the CP.

Just another look at the hinges.  Pretty heavy duty.  I can imagine some serious PC gaming on this, so I wanted it to be heavy enough to take the weight of my arms.

I added a 2x3 across the back and even with the bottom of the CP for some added stability.  This wasn't part of the original plans, but I'm glad I did it.

This part is done!

Showing the actual angle of the keyboard tray lip when closed.

This one picture doesn't come close to showing the effort it took to assemble this solo.  My back will be feeling it for days.

This is how I mounted the top shelves to avoid screws from the outside.


2nd coat of paint on and drying.  Next step is moving it to the basement.

Cost:
Keyboard Tray sliders: $5
Extra rollers: $3
Foam brush: $1
3 Vents: $30 - this was a bit of an unexpected expense.  I just saw them and thought they would be perfect!


Wednesday, March 13, 2013

Day 2

I finished all the cutting (well, most of it - a couple pieces will have to wait until after assembly to measure,) and the routing went wonderfully.  I was very concerned, but after a lot of googling and youtubing, i figured out how to set the bit close to the right depth, then try it on several pieces of wood to micro adjust to get the center.

After routing the edges of where the T-molding will go, I sanded with 220 grit paper and my little vibrating sander.  That didn't take as long as I expected so I went to get the paint.

I decided to go with the paint+primer in 1 from Lowes.  I figured this way, even the parts that I probably will just prime will be black and look more finished.  The first coat is on the backs of all the pieces, and I'm waiting just a bit to put the 2nd coat on.

No pics yet - as my phone isn't recognized as storage.  I really hate my phone.  It worked fine yesterday.

I decided to router the keyboard tray to make it smoother on my wrists.

First coat of primer on.  I'll assemble it with 1 coat on, then coat a second.

Sanding...

Play testing the software.  A TON of the mame roms won't work.  I don't know what's up with it, I'm sure it's my fault, gotta figure it out though.


Cost:
Elmer's Wood Glue: $2.98
Warner Paint Can Opener: $0.46
Glossy Primer and Paint in 1: $34.98
Elmer's Wood Putty: $4.99
Kobalt Drill bit: $4.58
4" Roller: $5.97

Tuesday, March 12, 2013

Day 1 on my widescreen 37" MAME

I decided after a long time of thinking about it that it was time to build a new MAME cabinet.  I actually built one about 7 years ago, but got side-tracked after getting it playable, and never went back to it.  It was for a 19" monitor.  When I got my mame stuff back out, it just looked so tiny, I knew I had to do better.  That started this project.

I have the software all running on my current PC and 37" monitor (tv) which will go in the cab, giving me an excuse for a new pc down the road.

Currently, I'm usuing GAMEEX for my front end and liking it a lot.

The initial sketch.  Based very much on:  http://www.kraylixarcade.com/

The rough pieces and very estimated measurements.  There will be a lot of eyeballing stuff.


Used my old wheels and 2x4's from my old mame cab to create a base.  34.5x18"

Ummmm.... Well, I cut into my saw horse.  I guess it could have been my leg.

This is the upper part of the side.  Mostly free handed the first one and tracing the other side.

Assembling the base (also, supporting New Jersey I guess.

Checking out the sides, base and front panel.  This will eventually have a door and coin door cut in.


Cutting the base side.

This is a huge stack of wood.  3 sheets total.

The sides stacked up and checked to make sure they are the same.  So far, so good.

The back piece.

I'll list the dimensions of everything I cut here.
Base Sides: 34 tall x 24 deep
Bottom Shelf: 34.5 tall x 18 deep
Front of Base: 34.5 wide x 28 tall
Marquee Trays (x2): 36 wide x 7 tall
Back of Lower Panel: 34.5 wide x 11 tall
Keyboard Tray: 33.5 wide x 14 deep
Speaker Tray: 36 wide x 9 deep

Outside Top Portion: 9" deep at top / 7" straight down front side, than angle for 46" before making an angled lower portion and angle back up.

Tomorrow is sanding and routing.  I'm fairly nervous about it, although my practice piece routed perfectly tonight.

Monitor Shelf will go on almost last so I can put it exactly where and at what angle I want.

I am going to attempt to keep track of how much this monstrosity costs me in the end.  I won't count screws/nails since I'll be working with the box my dad gave me when I moved to my first place.  I have about 8 trillion screws of different sizes.

3 Sheets of 3/4" Composite wood: $60
3 Sheets 240 Grade Sandpaper: $4
Tack Cloth: $3